Cryptic Woodworks Weekly Update July 11th 2021

Wow, has it really been that long since my last post? Well, I can’t guarantee that won’t happen again. but I’ll see what I can do.

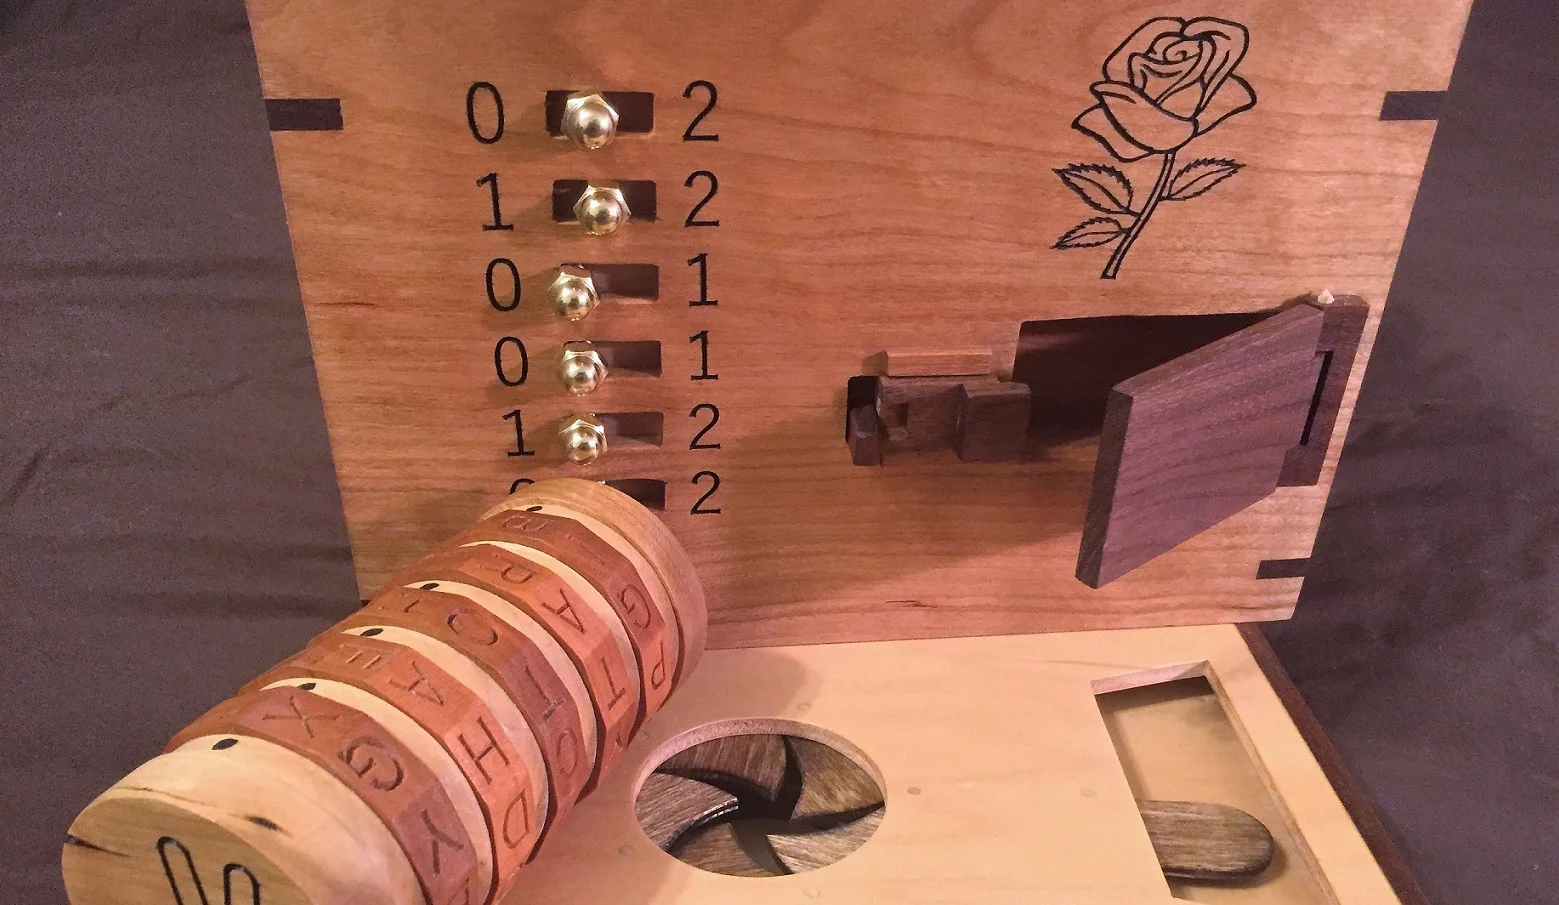
So, the Cryptic Woodshop has been busy of late. I finished retrofitting 8 of the Spring Open Tea Boxes and turned them into the The Former Tea Box. 7 of these were sold one was kept for my personal collection. I learned a lot working on these with regards to fitting puzzles into an already built box. It’s a different art form and sometimes calls for a few tricky jigs and fixtures. The reception for these was very good and I was happy with the complexity as I had the chance to tell one solver “Um, yeah, you aren’t done yet”

IMG_5740.jpg

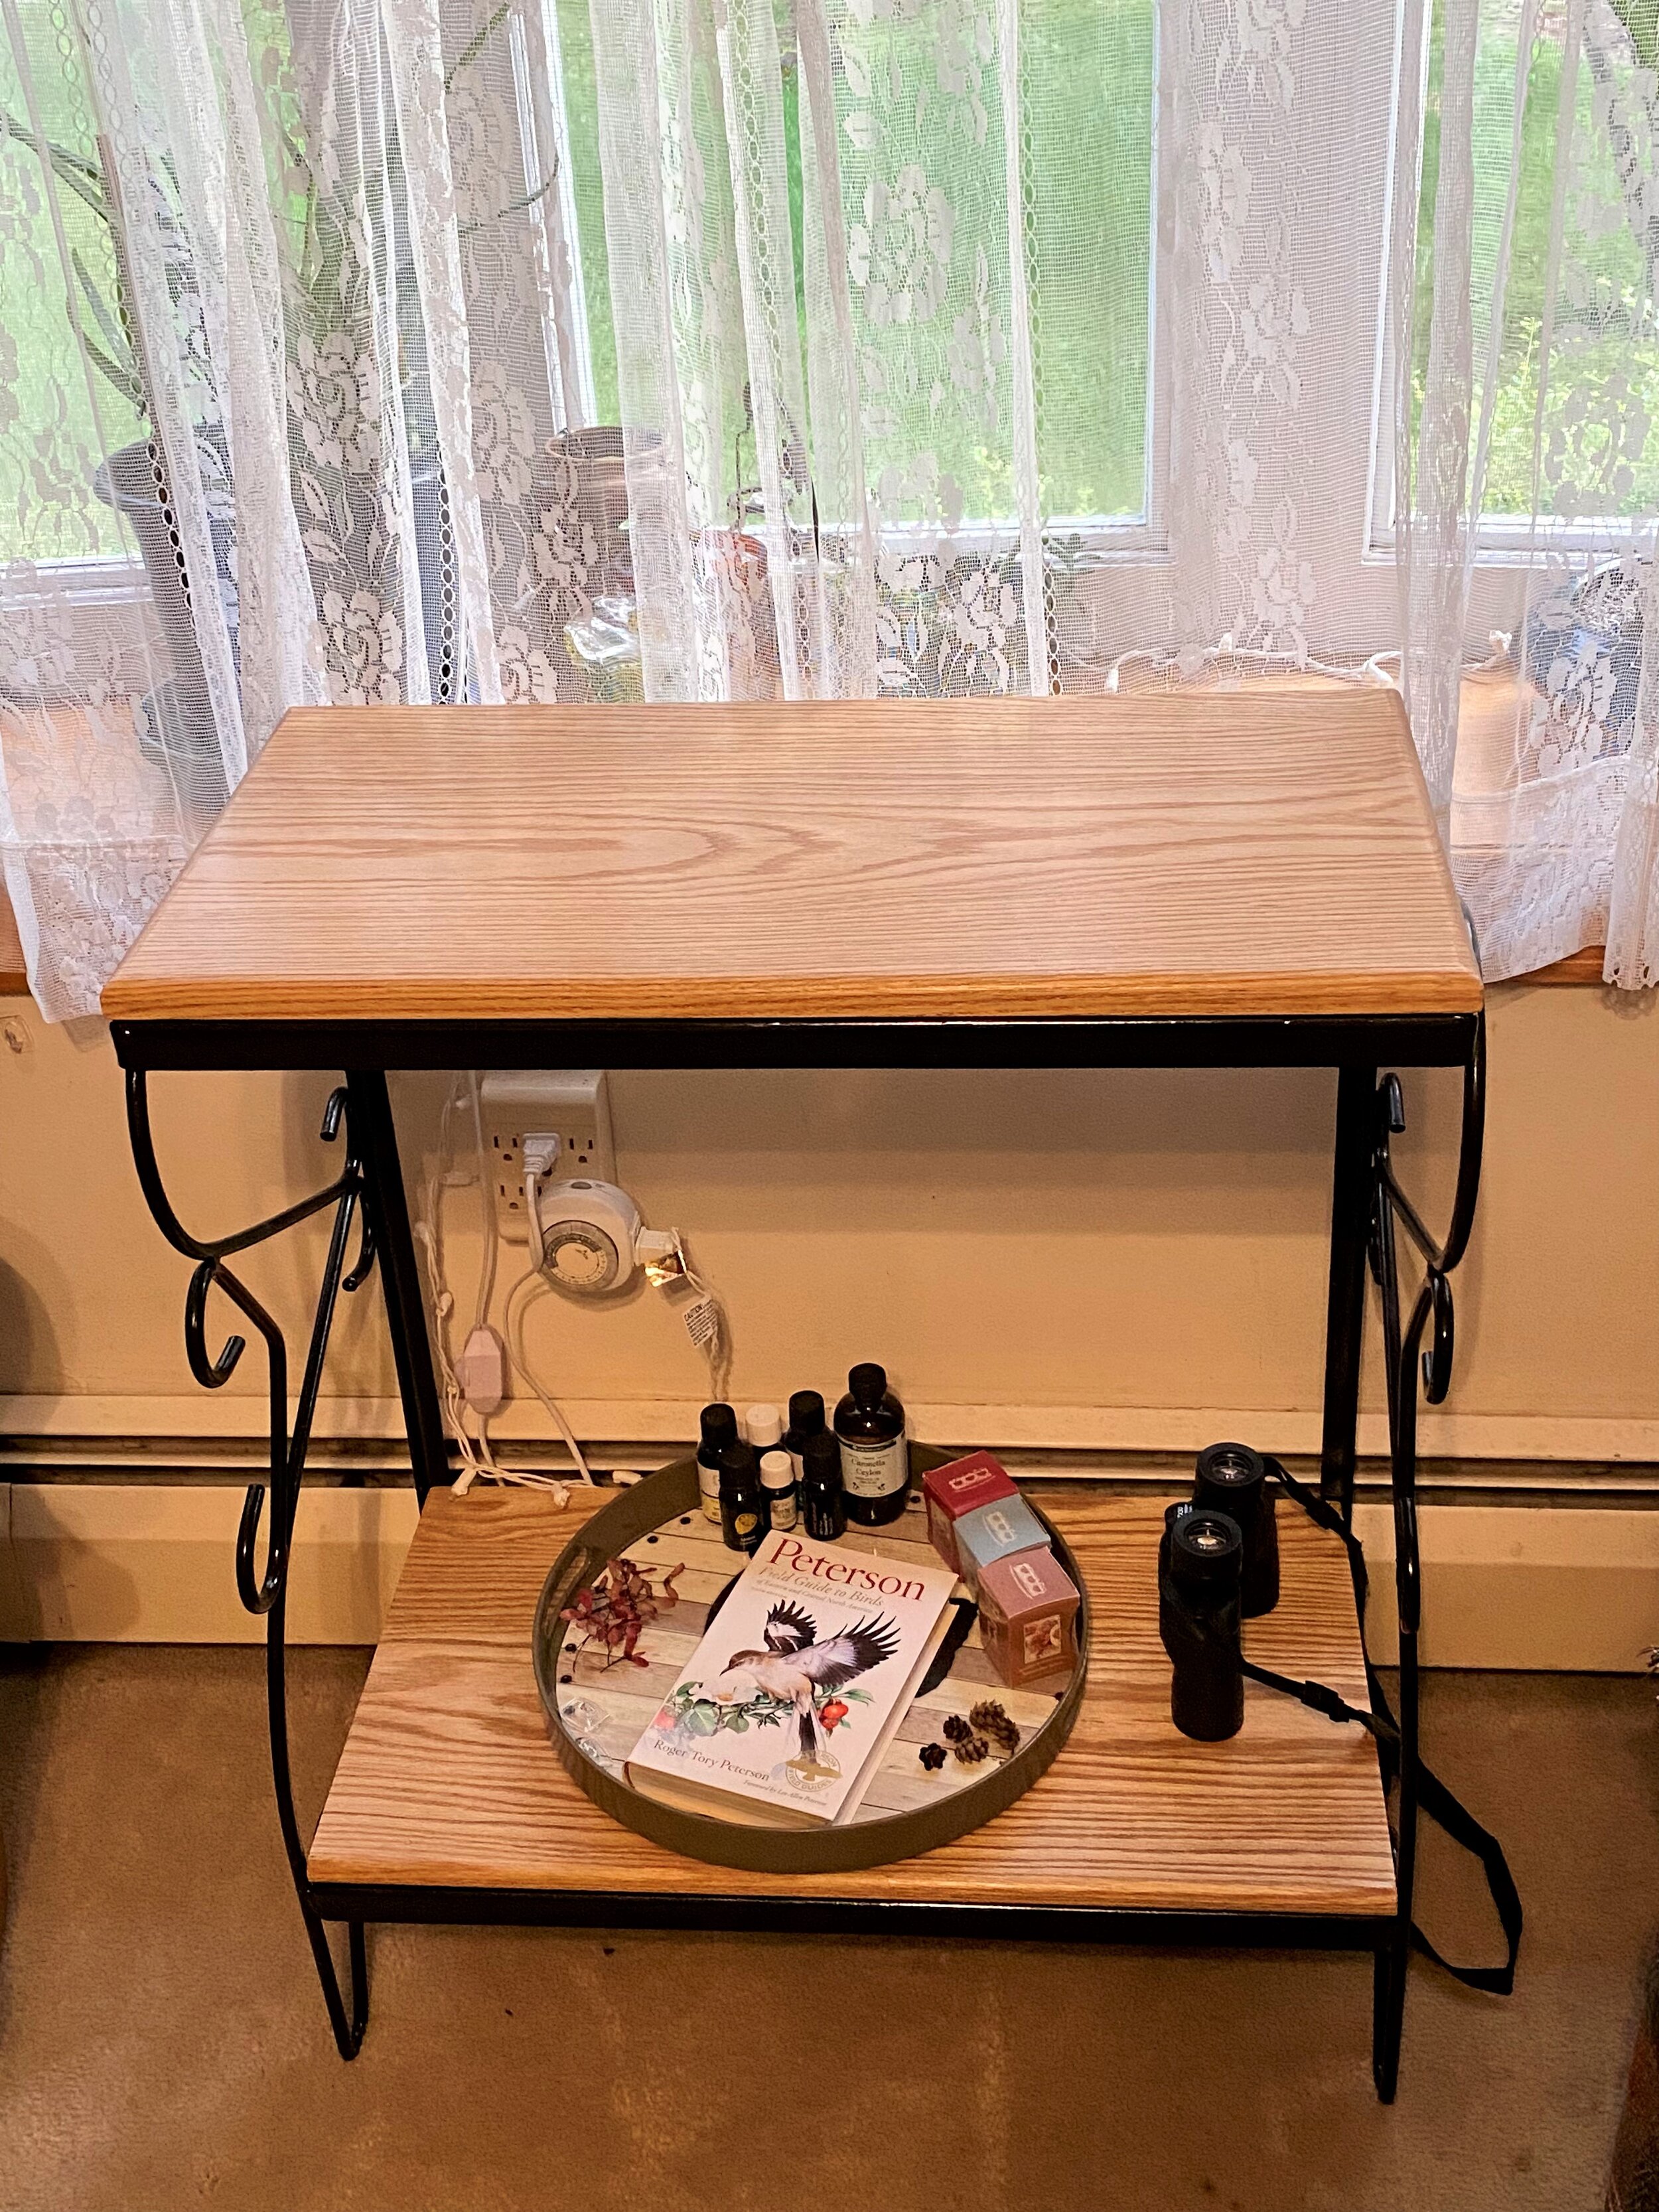
I also did a quick home project. We had an old metal stand around that had lost it’s top and shelf so I pulled some white oak out of the shed, milled it down, glued it up then oiled and finished it. This was supposed to be a plant cart for the patio but after we finished it looked way too nice so now the cart stays in the living room. And I guess I have to make another plant cart now!

Since the Former Tea Boxes sold so well, I decided to make more. It took me a bit to get there, but after enough asking I figured why not. I also had one damaged in travel so the first of this new set is going to be a replacement because I want to make sure my clients have a good item. Since I’ve just started the project I thought this might be a good time to write about stock prep for a project.

IMG_5723.jpg

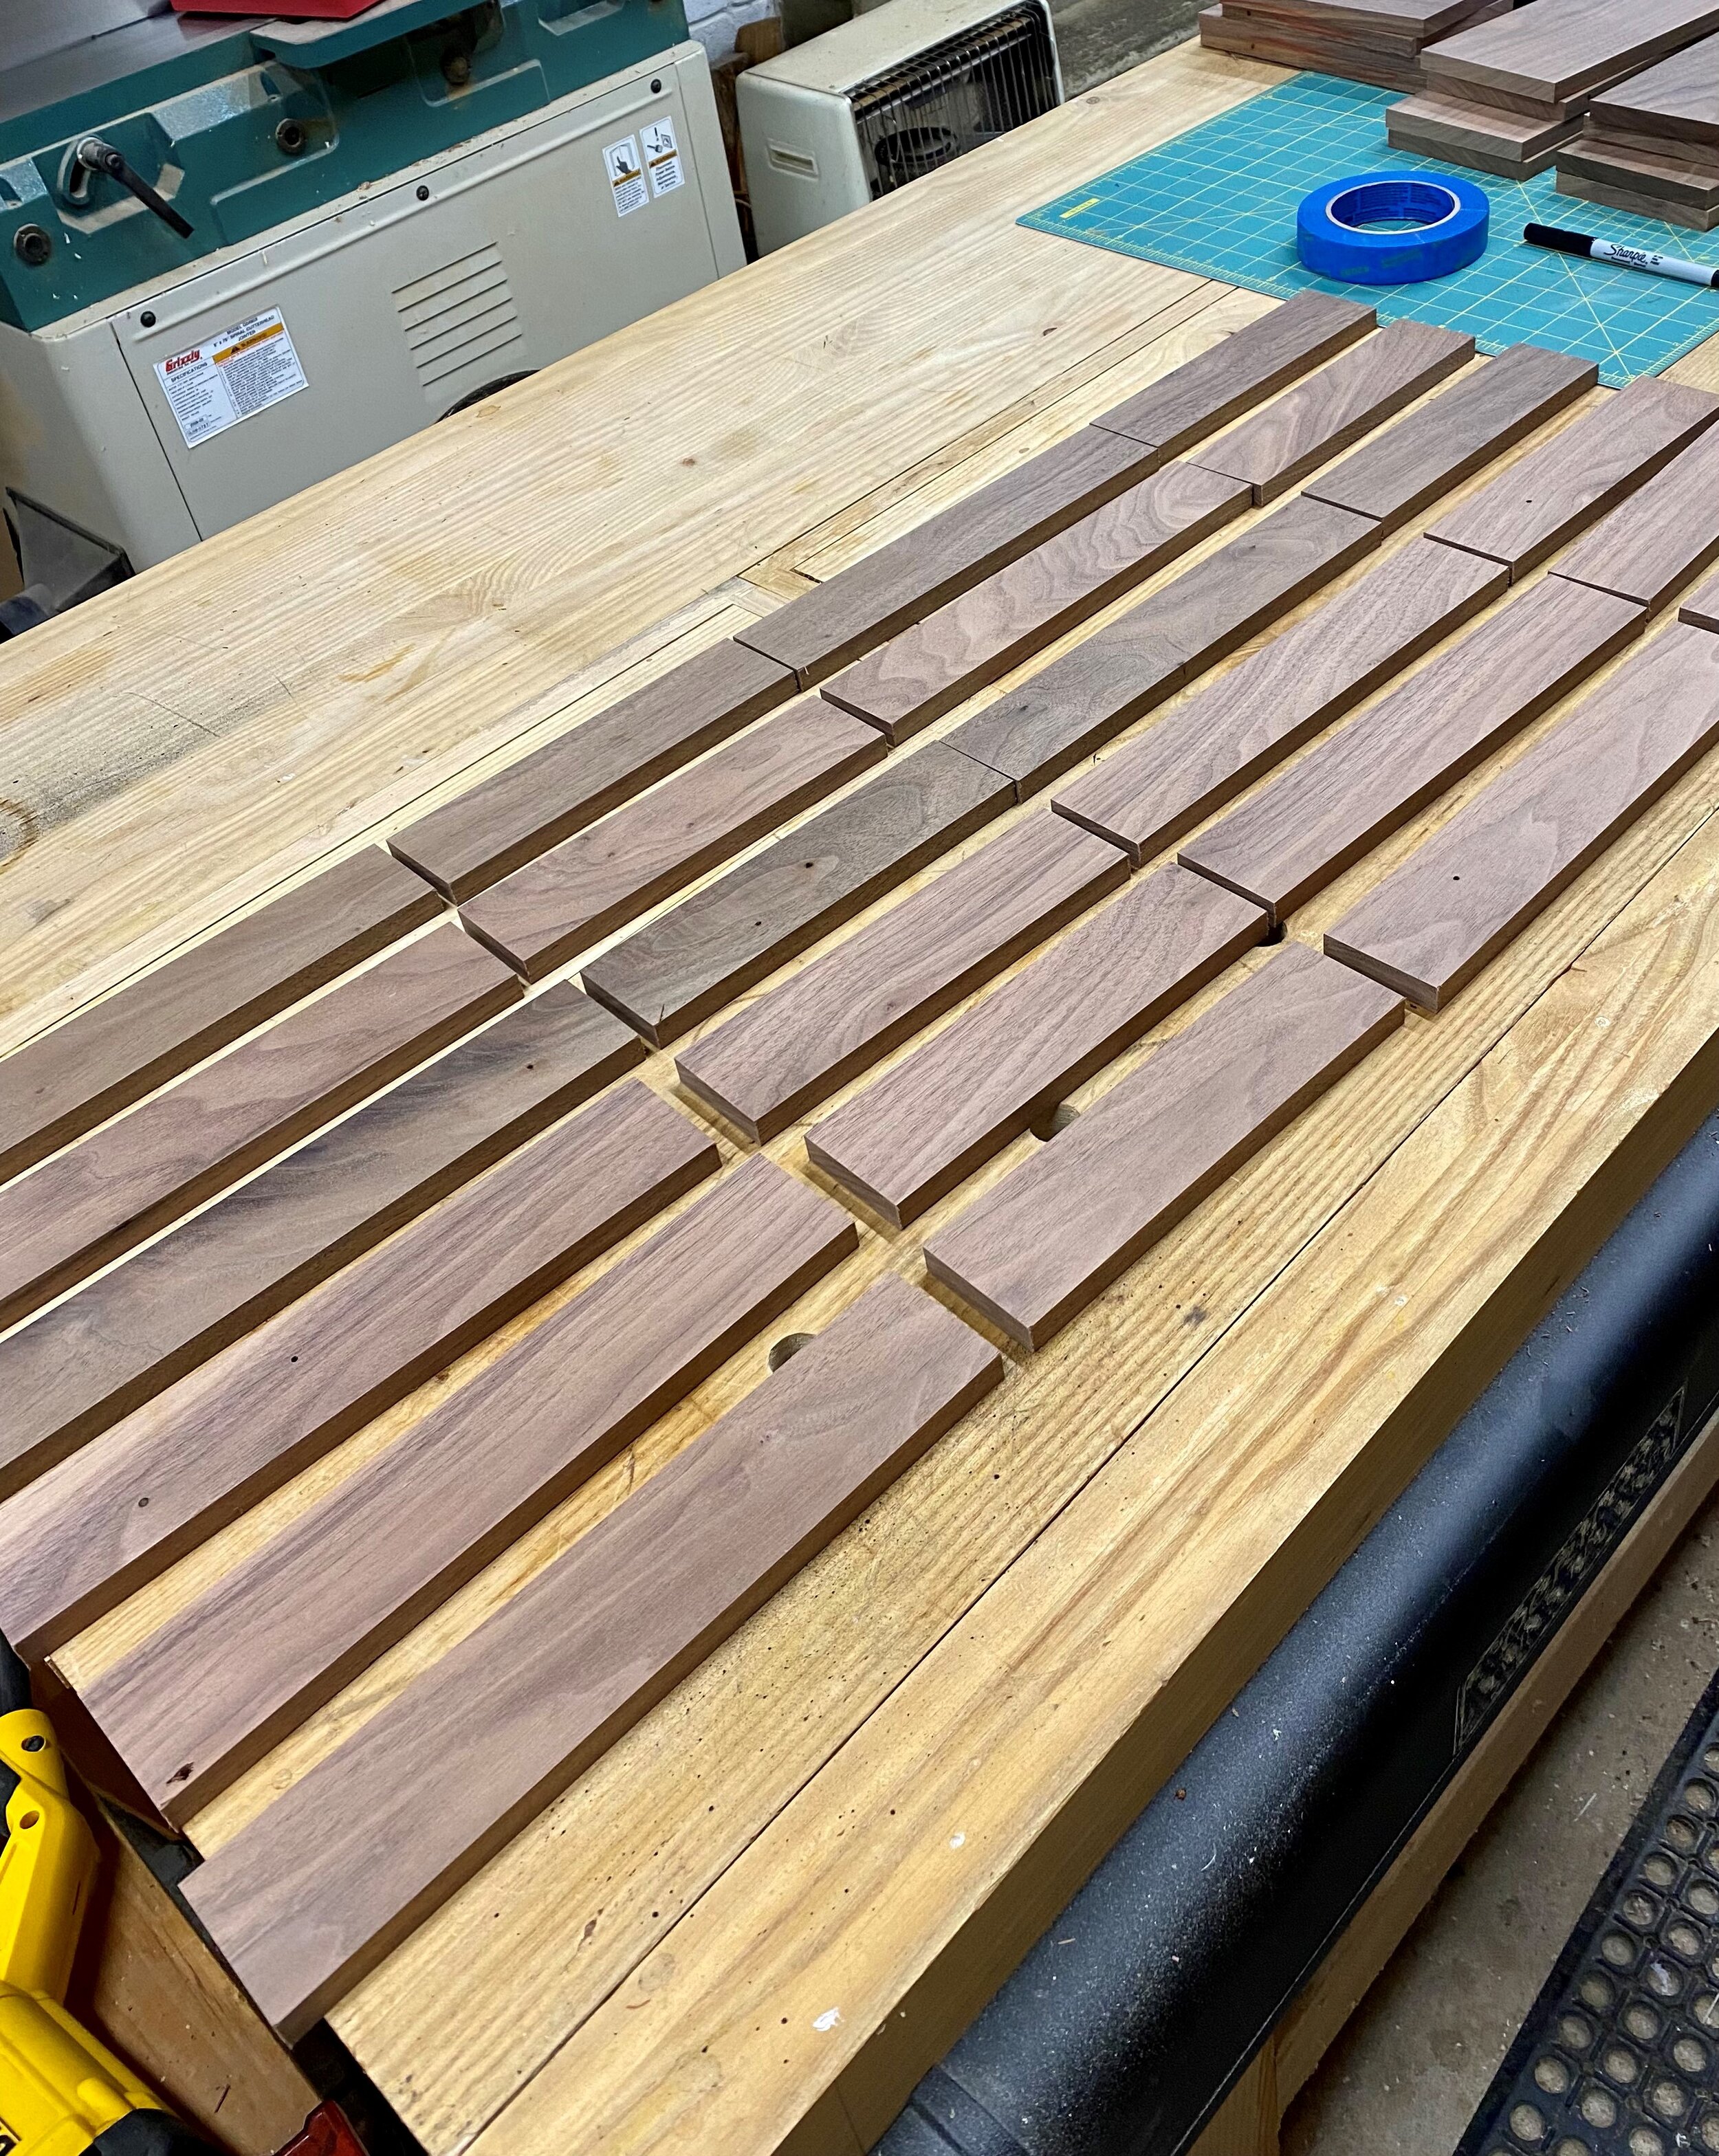
I want to make 6 more boxes and each box has a separated top and bottom. To make 1 top I need a piece of lumber 36” x 4 1/2” x 1/2” and to make 1 bottom I need a piece 38” x 2” x 1/2”. The walnut I have comes it right at 4 1/2” wide so 6 pieces will give me enough for the tops and 3 pieces will leave enough for the bottoms since I can rip them into 2” strips. I make things as long as I can, working around any major problems in the wood. This is reclaimed tongue and groove board so I check each piece with a metal detector (and still miss a nail!!!!). Here you can see I have a stack of pieces that are cut to length and have their tongue & groove ripped off.

Next up comes jointing. This is done on the jointer (seems like a fitting name) and our goal here is to get one face flat and one edge square. I like to use a lumber crayon and through some lines on the surface. This way, as I joint the board I can tell what’s left to take off. As you can see here, the first pass took off more of the middle so this board was likely cupped a bit along it’s length. One more pass and those lines are gone then I can joint and edge and mark it. You should mark your jointed edge as it’s too easy to forget later once things are all flipped around.

When jointing you can come across a variety of different scenarios to handle and there are lots of good articles and references to follow. I’ll just mention what I ran into. The board you see below was bowed along its length. When you find a board like this, you don’t want to apply force to the middle of the board because you will push it down, take off some material and it will spring back up. Instead, you want to take material from each end. Depending on the bow, you could feed the board through all at once, lightening pressure in the middle (you should hear it stop cutting). Or, you could push the board in a bit from each end to remove some material (be careful, the jointer can shoot it back at you). Either way, you’ll see material taken from each end, then hopefully you can joint normally.

Another situation is if you have on end thicker or just one end low. You can joint normally but be careful, you will start to make a wedge so keep and eye on your thickness.

After you’ve finished all this work you should have a nice pile of jointed boards.

With your boards all flat on one side, you can move to planing them to thickness. Why can’t you just start planing? If you don’t joint first, what often happens when planing is that if you send a bowed or cupped board through the planer, you wind up with a thinner bowed or cupped board. I needed to clean my planer as my feed rollers were slipping. I just wipe them down with a sponge and some soapy water. While I’m at it, I hit the beds with some of this SlipIT compound to make everything slide well (I’m not a rep or anything, just what I’ve used). I was aiming for 1/2” thickness, so I would put my jointed side down and keep planing till the top side was clean and that start flipping the boards end for end to try and taken the same amount of wood from each side. When you are done you should have a nice stack of very flat and square stock. When planing, make sure to keep an eye on your dust collector - it does make a lot of chips!

Now, you can work on cutting everything to size. I like to cut all my parts square first before mitering. I know my grain wrap isn’t absolutely perfect that way but I have lots of other work to do to these pieces first and those square sides make life a lot easier. When I’m sizing parts I love using setup blocks and my new setup block holder is the perfect addition to my shop. After you have all your parts cut to size, make sure you keep them aligned and sorted so you have a good grain match and then label them all. At this point, you have a lot of prepped stock and parts and your ready for the fun part - making all the puzzles!

Cryptic Woodworks Weekly Update 27 Jan 2019

So, the last two weeks were a little slow. It happens when you are an independent with a day job. That day job needed a bit more time as i have a new resource on board to train up and work into the team. Add onto that a problem with my right arm and I was slowed down a bit. Looks like the arm issue is in my neck, maybe a herniated disc that I’ll need to start physical therapy for. I’m hoping it goes well and I get my shoulder, neck and arm back soon. It doesn’t feel really bad, but some positions are sore/painful and other make my hand tingle and fall asleep. Aging, I guess. Comes with the territory. I’ve handled every other injury and come out on top. This won’t be any different!

IMG_3459.jpg

Some work went on, regardless of health or day work. Well, when I say work, what I really mean is the most difficult shelf ever made. If I was to ask you to make a simple shelf out of 2x4s that’s only 24” high you’d think, what, maybe a few hours, tops - and that’s if you need to get supplies. Well, strap in for this ride. I had a bunch of 2x4s sitting outside that used to hold lumber and firewood. They’ve been in the elements for years but were still decent, I just needed to do a quick joint, rip, plane to clean them up. That went pretty well till I realized I needed a little bit more. Of course, everything left outside was kinda wet - I had grabbed all the driest stuff. Luckily the fireplace was lit, so a few hours in front of that dried them enough. All the pieces cut, I grab my drill and Kreg jig to join it all together. After drilling a few holes, my trusty old Bosch portable drill shoots sparks out at me. Yep, drill died. So, my wife found our old corded Craftsman drill out in the barn which while it worked, would slip a lot and oddly enough lacked the power of the battery version. However, the job was done, all the pockets drilled. I only had 2 1/2 Kreg screws, but I thought they might work and they did for some of the parts. Others, though, they were too long. By this time it was late on a Sunday, too late to get more. Monday came and over lunch I picked not just the Kreg screws but a new pair of Bosch batter drills. That evening I did wrap up the work, but at this point I’m 3 days into a really simple project. But hey, I got new drills out of it!

IMG_3456.jpg

If you are wondering about the drills, I had a 5-7 year old Bosch 18v drill driver that had served me well. Especially around the farm it could drill through fence posts, assemble chicken coops, put raised garden beds together, you name it. In the shop, it did everything. Worst problem I had was it maybe being a little too big for some smaller projects. I always like it. What I picked up was a Bosch combo set which had the 18v drill driver and an impact driver along with 2 new batteries and a charger. Seems like my old batteries fit these too!. The drill driver is just as powerful and a somewhat lighter than the old one. The impact driver is much smaller. We got a chance to try the impact driver and let me say, these live up to their hype. They are meant for driving screws and do so with zest. We threw together a quick roost for a chicken living inside a bit and the little impact driver punched 2” deck screws through 2x4s with nary a pause. I am going to like this when working around the property! All that I needed was a proper “passing of the bits” ceremony.

I spent a few nights taking care of the photography and video of the engagement box. i won’t get another chance, so I wanted to make sure I got everything I needed now. I’m currently using just my iPhone and my shop lighting isn’t the best, so I’m really glad of photo editing tools. I got a lot of nice pics, plus a full video showing the whole box. I won’t post anything until it’s in the hands of the client, though. In terms of shipping, I’m just trying to figure out the best way to ship from the US to Australia. USPS seems the cheapest but they tell you nothing about properly filling out the customs forms and declaration. UPS seems nice but their cost estimator was 4 times higher which seems really weird. So, I’ll drop by the UPS store and check with them, see what they provide and if that estimate is at all accurate. I’d love to send it on it’s way this week!

Lastly I upgraded my old 8.5 version of V-Carve Desktop to 9.5 - this is the software that makes the designs for the CNC. The older version worked fine, but as I’m between projects I felt this was a good time to upgrade. Price was reasonable and there are some features I wanted. 2 sided cutting, better snap to grid, easier control of layers. I’ll be using it shortly as I design the sign I need to make that will close out all my old tasks. I’d like to do something that has a nice 2.5D carving as I haven’t done much of that. If you have a project, why not have some fun!

I’ve been looking at a Cricut. It’s a tool generally used by crafters, quilters and such. But, they are amazing at making stencils and can do much more fine work than a CNC since they essentially work as a drag knife. They are good at papercraft and scripting too. It could be a machine that gives me neat new capabilities.

That’s been the last few weeks. I’m looking forward to working on new puzzle boxes soon and have a bunch of ideas in my head. I want to add more puzzles, more complexity, more codes and a lot of uniqueness. It should be a fun year.

Until next time, stay dusty.

Cryptic Woodworks Weekly Update 13 Jan 2019

2019 is moving along full steam here in the Cryptic shop. I know I’m a day late on my posting but Sunday was pretty busy and I had to finish a post for my Lightly Reasoned blog (worth having a look if you’re into critical thinking concepts and some oddball humor). Winter is also starting to assert itself a bit here in the Northeast US. I have to start warming up the shop a bit before I get to work. Luckily it hasn’t gotten too cold and after about a half hour the shop is t-shirt comfortable.

Front Above Closed.jpg

Last week was a little light on the work but yet oh so satisfying. I wrapped up the engagement box. Yep, that’s right, it’s done. I assembled the lid the previous weekend and fit it to the box. All it needed then was a few coats of wiping poly as a topcoat which I took care of during the week. After that I smoothed everything with some 320 paper so it’s silky smooth now. I cut the brass hinge pins to size, sanding the final bit and attached the lid. Same with the side compartment hinges, cut and sanded to size then glued them in with a bit of CA glue. Lastly was putting on the brass caps for the sliding side puzzles with some blue Loctite - the blue is removable with normal hand tools. Wouldn’t you know it though, I ran out of Loctite and needed a quick store run. Be careful with Loctite, it can leak out and stick a part to the box - I have a few I’m making sure are loose enough to move and don’t stick. Since they are removable I can make small adjustments where needed.

Left Side Closed Lower Angle.jpg

I did some showing off of the finished box to may parents. They enjoyed getting a chance to see it’s secrets and mechanisms. Then I had to try and fix their audible account which meant hanging out on a phone with support. Hey, that’s what we do for our family. I learned a lot of my woodworking with my dad in his garage shop.

I got some rearranging and cleaning done in the shop too. Moved the sander and band saw to more accessible spots. Lathe is fully open and ready for use plus the cart it’s on is right behind me at the bench giving me more drawers to use. Its a safer place for my finer marking and measuring tools. I also talked with my neighbor, an electrician, about doing some wiring in the shop to give me more receptacles which I could really use.

As I said, bit of a light week but boy does it feel good to have the full engagement box done. I’ll spend the next week making any needed adjustments, taking pictures and shooting some video. Then, it’ll make it’s journey to Australia.

Coming up? I have a sign to make now that I’m through my other projects. Then it’s on to new puzzle boxes. I’m already thinking through some designs and locks. I’m looking forward to digging into those.

Until next week, stay dusty!

Cryptic Woodworks Weekly Update 06 Jan 2019

Wow, the first update of 2019. I hope everyone had a great Christmas, New Years and all the other holidays, whether Merry or Happy. it’s all good. It was nice for me, a few rather quiet days, visit with family, see some friends and even got out to a local art museum I’d never been too. Played a bunch of Hitman 2 (yeah, I’ve been a gamer for a loooong time), drank a bunch and ate a lot of cheese.

Making Puzzle Boxes.jpg

With the break over, it was time to get back to work. Well, actually I was working just before Christmas too. I had wanted to make a set of simple puzzle boxes as gifts. I started these on the Saturday before Christmas. That gave me 3 whole days, piece of cake. Well, the initial construction was easy, small mitered box, grooves for top and bottom, no big deal. But I wanted to locking system to require rocking the box in multiple directions to open it and what seemed simple turned out very finicky. Monday morning I know I wouldn’t make it. So I had to stop that and switch to some fast CNC carved signs. I got a bit creative with pictures for nieces and a friend, did my usual mask, carve, paint and finish all before about 2 PM on Monday the 24th. Then with spray lacquer still drying, put them in the car and headed to see my family. They came out great and everyone loved them. Sometimes our plans are bigger than our available time, eh? Unfortunately, I was in such a hurry I didn’t take pictures of the signs - doh!

Finished Puzzle Boxes.jpg

I did finish the boxes several days later, opting for a more simpler mechanic to open them. Wiped on some Danish oil and set them aside to dry. Now I’m nearly done for next Christmas, I guess. Still need to wipe some poly on after the oil cures, but that can happen anytime.


Ready to make holes.jpg

Then it was time to switch back to the engagement box. I wanted to add some decorative hearts to the inside of the lid, so I hand cut a bit of stencil mask, stuck it down and painted them. After that, it was time to steady myself, meditate, calm my nerves, practice steady breathing, etc. Why? Because I had to chisel two holes into the finished box so the top would have something for the locks to latch into and then drill through the sides for the tops pivot pins. So, yeah, I was about to cut holes in a perfectly good box. The side latch areas went smoothly, I just laid them out using my prototype, then carefully chiseled the areas out, taking just a bit at a time. I’d work the chisel around the edges, then chisel a file lines across and pop out the bit. Repeat this till I hit the depth I wanted. It was nerve wracking but went perfectly. Drilling the holes for the hinge pins went well too. I put a bit of tape on the sides so I could mark out the drill point, put a little tape flag on my drill bit to control depth and then just held the hand drill as straight and level as possible (it was too tall for my drill press). Went fine as well, the top pivots smoothly and locks and unlocks nicely. The top also got it’s coats of oil so it will wait a few days for it to cure then get some poly.

The engagement box will be done soon then. I’ll do some heavy use testing, make sure everything works perfectly. Then I’ll give it a nice photo opp, shoot some video and send it on it’s way. I’ll miss the little fella, it’s been a real part of my life this last year and a half.

I’ve got a sign to make now. Plus I have an old set of partially done puzzle boxes I’d like to unearth. I’d really like to get going on some new designs too. I have stock milled up for another set of boxes which I need to figure our the puzzles and locks and mechanisms for. So I’ll be keeping busy.

Conurers Alamaq.jpg

In the puzzling world I have a copy of The Conjurer’s Almanaq which is a kickstarter puzzle book. It shipped just before Christmas. I must say, I’m apparently better at creating puzzles than I am at solving them. I’m still on the first chapter and pretty well stumped. This is a puzzle hunt book, so you first have to find the puzzle, then solve it. Pretty sure I found the puzzle but a half dozen different solution attempts didn’t turn up anything that seemed right. Guess I’ll just keep working at it. It’s fun to try and I’m under no time pressure to solve it, that’s for sure.

Until next week, stay dusty!

Cryptic Woodworks Weekly Update 16 Dec 2018

I’ve had a fun couple of days in the shop. The weather is getting colder but the kerosene heater deals with that. The day job wasn’t quite as busy which gave me some extra time to work. Christmas is closing in so I’d better get to work on presents, but hey, I’ve got a week!

Most of my work was on the engagement box. After getting the picture transferred last week I could do some remaining work on the individual parts before assembling. I added some extra bordering and text to the bottom of the lid with the image. This was via my normal method of stencil mask, CNC carve, paint, remove mask. I cut the lock bar notches into the frame, then glued up the frame, glued in the bottom (which stays permanent) and glued down the lock components. In the picture, you can see I use a pretty standard spring lock - being simple means it also works simply and I like that. I’m attaching the top with a few screws and threaded inserts. This way, if those locks ever do have a problem someone could open and fix them. I have to get 2 more threaded inserts, I didn’t have enough on hand! What remains then is to apply some finish to the lid, put notches in the box to capture the lock bars and then drill holes for hinge pins. I can see the finish line!

Sign Edited.jpg

I also did a quick Christmas gift job that was a CNC carved sign of a friends favorite sayings. We just layed it out in v-carve, picked nice fonts and sizes, then the usual mask, carve, paint and peel went on. Later we’ll do some light sanding, shoot on a few coats of lacquer. We wanted to do something personal and handmade. I think they make great gifts.

While I have off Monday apparently I get to go and try to find a new fireplace fan. Our went Friday and of course the shop that sells such parts isn’t open over the weekend. So, instead of shop time I get to run around, hopefully find the right fan and install it. And I was hoping to get going on making Christmas puzzles. Oh well, have to do what’s necessary, don’t we. At least without the fan on it’s still a fireplace and gets hot!

Until next week, stay dusty!

Cryptic Woodworks Weekly Update 09 Dec 2018

As I look back at my previous blog entry I realize that almost a full month has passed. The last month had it’s ups and downs - both of which rather limited my woodworking time. I had done some traveling to visit my wife’s family in Central Illinois who we hadn’t seen in some time. Then I went straight to a week long team gathering in Cleveland, Ohio for the day job. I came home with a horrible cold (and I wasn’t the only one to get sick) that hung on for almost 2 weeks. I still have a cough I can’t quite shake. So my month went away pretty quickly.

Photo Dec 09, 2 19 41 PM.jpg

But that’s all done, the kerosene heater is fueled up and running and tools are making noise and dust again. The first thing I wanted to tackle was the lid top for the engagement puzzle box. I hadn’t liked just having the keyholes on it so I made some hearts out of walnut to cover them. Then, a few magnets and washers and I had a great accent that added one more bit of a puzzle to the box. The next step was to add the names and carving. I had wanted to do this with a laser but I was having trouble getting to the site that had it what with timing, costs, classes to learn it, etc. So, since I’ve gotten good with the stencil mask on the CNC I went that route. I purchased several stencil border image packs off Etsy and picked what I like. Then it was a simple matter of getting it right in VCarve, exporting the toolpaths and cutting away. Paint, remove mask and viola, great looking top!

Next up came the task of getting a picture of the couple onto the underside of the lid so you see it when opened. Again, this was meant for laser work, but see above for all the holdups. I did some research, watched a lot of YouTube videos and found several ways to transfer photos to wood. After many tries and failures I got something that worked out nicely.

First was printing with an inkjet onto label paper where the label were removed. The ink won’t try so all you do is put this face down on your wood being careful not the move it, rub it to transfer the ink and viola - great image. Well, not so much for me. Maybe because I wanted black and white or I had too much details or something, but it looked terrible.

Then I tried using water based polycrylic. I only had Generals high durability clear coat on hand, so I put down a layer of that and then pressed a laser printed image (you want laser as its the toner you are transferring) onto the finish, smoothed it out and waited till it was dry. Then you wet the paper and rub it off with your fingers, sponge, toothbrush, etc. It was barely passable.

Then I went and got regular polycrylic satin finish and used that. Same thing, lay down a coat, press the image in, wait till dry and wet and wipe off. It was better but big chunks of the image came away and I wiped away the wet paper.

Then I saw another video that said to gently wipe just some of the paper. Hit it with a hair dryer to set everything, then wet and very gently wipe away again. Repeat until it’s pretty clean and you don’t dare try more. This worked nicely. The image came out looking great, only a bit of the toner came up but nothing that hurt it. Let it dry thoroughly (or use the hair dryer again) and you may still see a lot of what looks like white paper showing up. Don’t worry, spray on some lacquer and that will disappear and just the image is left. Plus the lacquer will sharpen it up.

So that was my Odyssey over the weekend. My foray into crafting, I guess. But hey, we can use all these skills in our work. Why wouldn’t we. We can make great things.

Until next time, stay dusty!

Cryptic Woodworks Weekly Update 14 Oct 2018

So, a few weeks got away from me. The day job was busier than normal, a few more personal obligations than normal and suddenly I find myself not in the shop. These things happen when you are a part time woodworker. Occasionally my non-woodworking life takes over. The important part is to try to limit the amount everything else takes (where appropriate, things will happen).

I didn’t get a ton of time back in the shop, but I got some! I have several things to do so I just had a to pick a place to dive in. I chose a rebuild of the iris drawer which is part of the engagement box commission (more on it’s hold up in a bit). The iris was beginning to bind up in the oppressive humidity we’ve had lately in NE Pennsylvania recently and wasn’t working smoothly. Initially, I wanted to get this done and just glued the box together, top and all. Which, of course, means I had no way to fix the mechanism. So, I decided to make a new one which had a removable top. The main build was quick, just four side pieces. I had the plans for the CNC so cutting new iris parts was simple. The change I made was to add corner blocks with threaded inserts which would hold bolts that come in through the top. That just took a bit of measuring but was pretty simple. I also didn’t extend the dowels of the iris up through the top so it looks much cleaner. Lastly, the parts are made from cherry ply to match the rest of the box (I didn’t have that initially). My retaining ring did break and I had to make a new one, but that was no big deal. Bead moulding is on the front, recess for the latch is on the bottom, oil is applied. Now I wait a few days before topcoating.

I had a bit more time to turn my attention back to the lid of the engagement box. I had wanted to make some hearts that would cover the keyholes but could swivel aside. This just took a bit of time in v-carve to draw the design then a mere minute or two to cut on the CNC. I have to clean them up but they look nice and will add a bit more visual flair to the lid. I’m thinking of trying a relief carving for the top as well.

The hold up on the box has been the laser engraving. I want to use a nearby Fab Lab (makerspace) so I get to learn the equipment and can continue to use it in the future. Back in June they were moving to a new space and were supposed to be done my mid July. Well, that turned into early September with delays and problems. Once they were running again I called to grab some time only to find out the laser wasn’t venting correctly and a fix could take another couple of weeks. So, here I am in Mid Oct hoping I can get the last pieces done soon. Hey, the delay gave me time to make the new iris drawer so it was kinda good, I guess?

About 2 weeks ago I also completed my article for an upcoming issue of The Metagrobologist Magazine. The publisher loved the article and is working on getting it in place. Very excited to see that move forward. I loved writing the article and it’d be great to do more. I can’t believe I’m going to be published. That’s a direction I didn’t originally see my life going. Some of that old college education is coming in handy.

Light week for me, but at least a few things happened!

Until next week, stay dusty.

Cryptic Woodworks Weekly Update for 23 Sep 2018

Some tools ran, noise was heard and dust flew (hopefully into the dust collector). I did have another week that had a lot of extra time for the day job and my shop time was minimal. I made do with what I had though.

Finished Button Box. Smalljpg.jpg

Through out the week I worked on getting the last Button Box finished. The weather here has still been very humid and that makes finishing a project hard. Humidity slows down drying times, occasionally by a lot. I use Minwax wiping poly as a top coat and on a good day I can put on 3 coats. In this weather, I could do maybe one a day. The dry time is that much slower. Plus that means I wind up with more dust nibs and need to do some extra sanding with a 0000 sponge later to smooth them out. But, after putting on a few coats with long wait times in between, the last box is done. I waxed the moving pieces, glued on those I didn’t want to move and I’m ready to ship it out. This was done as a request so it is spoken for already. Now, how do I create a product for just one person on something like Etsy so I can accept the payment?

Then finally, late Sunday afternoon, I decided it was time to get some new projects going. I don’t know quite what I’m going to do, but I know I want to use the general structure of my engagement box. I like the size and it gives me room to add in other mechanisms. So, I got into the shed, pulled out some boards and decided to mill up enough stock for 7 boxes. Everything is just a bit over long and thick so I’ve still got some wiggle room. I’m using different woods this time: 2 from cherry, 2 from maple and 2 from red oak. One more will use both cherry and maple and will likely be the box I keep and the one I do my main setup and testing on. I didn’t have enough in to get one more out of a single species but had chunks of cherry and maple to use up. Milling up is a tiring step but yet somehow fun. I cut the rough stock to size, often by hand to crosscut boards down. Rip them to near width, then joint and plane. The planer needs it’s feed roller cleaned first and the tables waxed. I use a product called Slipit - always worked well for me. After that it’s just feed and flip and feed and flip, making some adjustments if I read the grain wrong and got some tearout. The only problem I have is that maple likes to take a long chip and clogs my planer’s dust chute. I’d love to replace the old Delta at some point. Maybe even sell the planer and jointer and go for a combo machine instead.

It wasn’t a huge week, but it felt good to finish the Button Box and get some stock prepped for new boxes. I know my time is going to stay sporadic so having big operations done means I can get in bits of work throughout the week as I have time.

Until next week, stay dusty!

Cryptic Woodworks Weekly Update 09 Sep 2018

I know, I know .. I missed a week.  Last week was the US Labor Day holiday and I took some extra time off including the work holiday to get more time away.  The time off from the day job also meant time away from the shop - I really needed a bit of downtime.  We did get some hiking in at nearby parks which was fun, bought a new car to replace the truck, saw some family, at a few burgers and drank some beers.  It was good to get away from it all for a while.

Last Button Box Small.jpg

This week was also short (due to holiday, see above) but I got a little shop work in.  I got a request to finish off my last Button Box which had sat on the shelf about 2 years because it needed a bit more work and then I got on to other things.  So, I set about making the two new locking bars I needed. These weren't a ton of work but took up a night or two.  They are in and working well.  The old ones were slightly short and made the assemblies a little too smushed together.  I did some extra sanding and fitting, added a few of the other secret bits and put two coats of danish oil on.  Looks nice now.  I just need to wait several days for the oil to cure, add some poly, do final assembly and send it out.

I also finished a constellation ring cipher wheel center for a friend who like the constellation ring.  That got some sanding, slight fixing of any letters that weren't painted well enough, and then it's own oil treatment.  It too will wait several days before getting a top coat.

I expect work to pick up more now.  The local maker space, The Fab Lab, near me is open again so I can get in to do the laser engraving for the engagement box which is the last major piece for that.  I look forward to wrapping that up.  I have a sign to engrave.  And I have an article to finish and send off.  Then, it's on to new projects (or possible picking up older shelved ones).  I've had some requests to do another run of my original puzzle box, the aptly titled Mysterious Wood Puzzle Box, and I have some ideas to do a new design on that.

Nothing ground shaking in this update.  Until next week, stay dusty.

Cryptic Woodworks Weekly Update for 26 Aug 2018

Drill Press Table - Editied Small.jpg

Hey, I've got a new drill press table!  If you read last week you'll know I was working on a new table but I ran out of 1/4x20 t-nuts and had to wait for them to show up.  Thanks to Lee Valley I had them in hand by Tuesday and was able to finish up the main table.  I already like it and I haven't even had to really use it yet.  With all the mounting points I can use every jig from my table saw sled here as well.  Just having all the toggle clamps available is so nice.  I milled out the center to take 4x4 inch pieces of 1/4" material so I can both rotate and flip them as they get chewed up.  I made a few out of some scrap pine.  The fence is pretty dirt simple, straight piece of baltic birch ply with a few slots cut it in - just move it around as needed.

Cross Slide Vise Mounting - Edited Small.jpg

Next up came a plate to mount my cross slide vise on that would also have holes to mount on the table.  I like having the cross slide and I think I'll use it more now that it's easier to mount.  It was a simple job, just lay out some holes to put some bolts that lined up with the mounting points on the vise, drill out some recesses with a forstner bit and the bolt the vise to the board.  Before you bolt it, though, drill holes that will line up with the holes in the drill press table.  I used my CNC for that to get them really precise.   Now, whenever I need the vise is a simple task to pop it on the table and lock it down.  I have been asked a few times if I mill on the drill press and the answer is no. Drill presses are terrible mills - you could damage the machine or have a chuck fly off and maybe get hurt.  But these vises can hold all manner of small things and move through the x-y axis nice and straight.  

I spent a lot of time this week on writing my upcoming article.  So that consumed most of my shop time.  I still consider writing about woodworking to be woodworking, though!  It's coming along nicely, at least I think it is.  I've never written a magazine article before.  

Final Button Box - Edited Small.jpg

I wrapped up the week dusting off my last remaining copy of The Button box.  This has been on the shelf a while.  It needs two new parts created, which is why it got shelved earlier.  These are just the slide locks and aren't a very difficult job, just a bit tedious to make sure the match up.  The original two were a slight bit short I didn't like how they worked.  Once those are done, I can put some oil on and then top coat.  This box is already spoken for, hence why I'm wrapping it up.  I just always seemed to be working on something else and never got back to this one.  Hopefully it'll be ready in a few weeks.  Feels good to finish this one up.  This was a fun run of boxes where I learned a lot.

On a slight side note, I wonder if anyone else has been on a walk in the woods, looked at all the trees and sighed, knowing you can't use any as lumber?  I love hiking and being out in the woods, but sometimes you see such great trees and know they have good lumber!  But we can't use it all.

Until next week, stay dusty!